Installing Agent Mesh Enterprise
This guide walks you through installing and running Agent Mesh Enterprise using Docker. You will download the enterprise image, load it into Docker, and launch a container configured for either development or production use.
All the docker commands can also be run using any Docker-compatible tool, such as Podman.
Prerequisites
Before you begin, ensure you have the following:
- Docker installed on your system
- Access to the Solace Product Portal
- An LLM service API key and endpoint
- For production deployments, Solace broker credentials
Understanding the Installation Process
The installation process consists of three main steps. First, you download and load the Docker image into your local Docker environment. This makes the Agent Mesh Enterprise software available on your system. Second, you identify the exact image name and tag that Docker assigned during the load process. You need this information to reference the correct image when starting your container. Finally, you run the container with the appropriate configuration for your use case—either development mode with an embedded broker or production mode connected to an external Solace broker.
Step 1: Download and Load the Enterprise Image
You need to obtain the Agent Mesh Enterprise Docker image from the Solace Product Portal and load it into your Docker environment.
Download the latest enterprise docker image tarball from the Solace Product Portal.
After downloading the tarball, load the image into Docker. This command extracts the image from the compressed archive and makes it available in your local Docker image repository.
docker load -i solace-agent-mesh-enterprise-<tag>.tar.gz
Ensure you replace <tag> with the appropriate version number from your downloaded file.
Step 2: Identify the Image Name
After loading the image, you need to identify its full name and tag. Docker assigns a repository name and tag to the image during the load process, and you will use this information when running the container.
Run the following command to list all Docker images on your system:
docker images
The output displays all available images with their repository names, tags, image IDs, creation dates, and sizes. Look for the Agent Mesh Enterprise image in the list.
Example output:
REPOSITORY                                                                 TAG                IMAGE ID      CREATED      SIZE
868978040651.dkr.ecr.us-east-1.amazonaws.com/solace-agent-mesh-enterprise  1.0.37-c8890c7f31  2589d25d0917  9 days ago   5.25 GB
Take note of the complete repository name and tag. You will need this full identifier when starting the container. In the example above, the complete image name is 868978040651.dkr.ecr.us-east-1.amazonaws.com/solace-agent-mesh-enterprise:1.0.37-c8890c7f31.
The numeric hashes at the beginning and end of the repository name (such as 868978040651 and c8890c7f31) vary between versions and builds. Your image will have different hash values.
Step 3: Run the Container
You can run Agent Mesh Enterprise in two different modes depending on your needs. Development mode uses an embedded Solace broker for quick testing and experimentation, while production mode connects to an external Solace broker for enterprise deployments.
You may need to include --platform linux/amd64 depending on the host machine you're using.
Agent Mesh Enterprise uses secure-by-default authorization. Without explicit authorization configuration, the system will deny all access to protect your deployment.
For production use, you must configure RBAC (Role-Based Access Control) to grant access to users. See the RBAC Setup Guide for details.
For development/testing only, you can disable authorization by setting type: none in your configuration, but this should never be used in production. (see example below)
Running in Development Mode
Development mode simplifies getting started by using an embedded Solace broker. This configuration requires fewer parameters and allows you to test Agent Mesh Enterprise without setting up external infrastructure. Use this mode for local development, testing, and evaluation.
The following command starts a container in development mode. The -itd flags run the container in interactive mode with a pseudo-TTY, detached in the background. The -p 8001:8000 flag maps port 8000 inside the container to port 8001 on your host machine, making the web UI accessible at http://localhost:8001.
docker run -itd -p 8001:8000 \
  -e LLM_SERVICE_API_KEY="<YOUR_LLM_TOKEN>" \
  -e LLM_SERVICE_ENDPOINT="<YOUR_LLM_SERVICE_ENDPOINT>" \
  -e LLM_SERVICE_PLANNING_MODEL_NAME="<YOUR_MODEL_NAME>" \
  -e LLM_SERVICE_GENERAL_MODEL_NAME="<YOUR_MODEL_NAME>" \
  -e NAMESPACE="<YOUR_NAMESPACE>" \
  -e SOLACE_DEV_MODE="true" \
  -e SAM_AUTHORIZATION_CONFIG="/preset/auth/insecure_permissive_auth_config.yaml" \
  --name sam-ent-dev \
  solace-agent-mesh-enterprise:<tag>
Replace the placeholder values with your actual configuration:
<YOUR_LLM_TOKEN>: Your API key for the LLM service<YOUR_LLM_SERVICE_ENDPOINT>: The URL endpoint for your LLM service<YOUR_MODEL_NAME>: The name of the LLM model you want to use (you can specify the same model for both planning and general tasks, or use different models)<YOUR_NAMESPACE>: A unique identifier for your deployment (such as "sam-dev")<tag>: The image tag you identified in Step 2
The SOLACE_DEV_MODE="true" environment variable tells the container to use the embedded broker instead of connecting to an external one.
Example: Basic Development Mode (Secure Default - Access Denied)
docker run -itd -p 8001:8000 \
  -e LLM_SERVICE_API_KEY="<YOUR_LLM_TOKEN>" \
  -e LLM_SERVICE_ENDPOINT="https://lite-llm.mymaas.net/" \
  -e LLM_SERVICE_PLANNING_MODEL_NAME="openai/vertex-claude-4-sonnet" \
  -e LLM_SERVICE_GENERAL_MODEL_NAME="openai/vertex-claude-4-sonnet" \
  -e NAMESPACE="sam-dev" \
  -e SOLACE_DEV_MODE="true" \
  --name sam-ent-dev \
  868978040651.dkr.ecr.us-east-1.amazonaws.com/solace-agent-mesh-enterprise:1.0.37-c8890c7f31
Note: This configuration uses secure defaults and will deny all access. You must configure RBAC or use the permissive development configuration below.
Example: Development Mode with Permissive Authorization (Development Only)
You can use the pre-configured development configuration file provided in the preset directory. Run the container with the SAM_AUTHORIZATION_CONFIG environment variable pointing to this file to disable authorization checks.
docker run -itd -p 8001:8000 \
  -e LLM_SERVICE_API_KEY="<YOUR_LLM_TOKEN>" \
  -e LLM_SERVICE_ENDPOINT="https://lite-llm.mymaas.net/" \
  -e LLM_SERVICE_PLANNING_MODEL_NAME="openai/vertex-claude-4-sonnet" \
  -e LLM_SERVICE_GENERAL_MODEL_NAME="openai/vertex-claude-4-sonnet" \
  -e NAMESPACE="sam-dev" \
  -e SOLACE_DEV_MODE="true" \
  -e SAM_AUTHORIZATION_CONFIG="/preset/auth/insecure_permissive_auth_config.yaml" \
  --name sam-ent-dev \
  868978040651.dkr.ecr.us-east-1.amazonaws.com/solace-agent-mesh-enterprise:1.0.37-c8890c7f31
⚠️ Warning: This configuration disables authorization and grants full access. Use only for local development.
Running in Production Mode
Production mode connects to an external Solace broker, which provides enterprise-grade messaging capabilities including high availability, disaster recovery, and scalability. Use this mode when deploying Agent Mesh Enterprise in production environments.
The production configuration requires additional environment variables to specify the Solace broker connection details. These credentials allow the container to connect to your Solace Cloud service or on-premises broker.
docker run -itd -p 8001:8000 \
  -e LLM_SERVICE_API_KEY="<YOUR_LLM_TOKEN>" \
  -e LLM_SERVICE_ENDPOINT="<YOUR_LLM_SERVICE_ENDPOINT>" \
  -e LLM_SERVICE_PLANNING_MODEL_NAME="<YOUR_MODEL_NAME>" \
  -e LLM_SERVICE_GENERAL_MODEL_NAME="<YOUR_MODEL_NAME>" \
  -e NAMESPACE="<YOUR_NAMESPACE>" \
  -e SOLACE_DEV_MODE="false" \
  -e SOLACE_BROKER_URL="<YOUR_BROKER_URL>" \
  -e SOLACE_BROKER_VPN="<YOUR_BROKER_VPN>" \
  -e SOLACE_BROKER_USERNAME="<YOUR_BROKER_USERNAME>" \
  -e SOLACE_BROKER_PASSWORD="<YOUR_BROKER_PASSWORD>" \
  --name sam-ent-prod \
  solace-agent-mesh-enterprise:<tag>
Replace the placeholder values with your actual configuration. In addition to the LLM service parameters described in the development mode section, you need to provide:
<YOUR_BROKER_URL>: The secured SMF URI for your Solace broker<YOUR_BROKER_VPN>: The Message VPN name for your Solace service<YOUR_BROKER_USERNAME>: The username for broker authentication<YOUR_BROKER_PASSWORD>: The password for broker authentication
The SOLACE_DEV_MODE="false" environment variable tells the container to connect to the external broker specified by the other SOLACE_BROKER parameters instead of using the embedded broker.
Ensure you have set up proper RBAC authorization for production deployments. For more information, see RBAC Setup Guide.
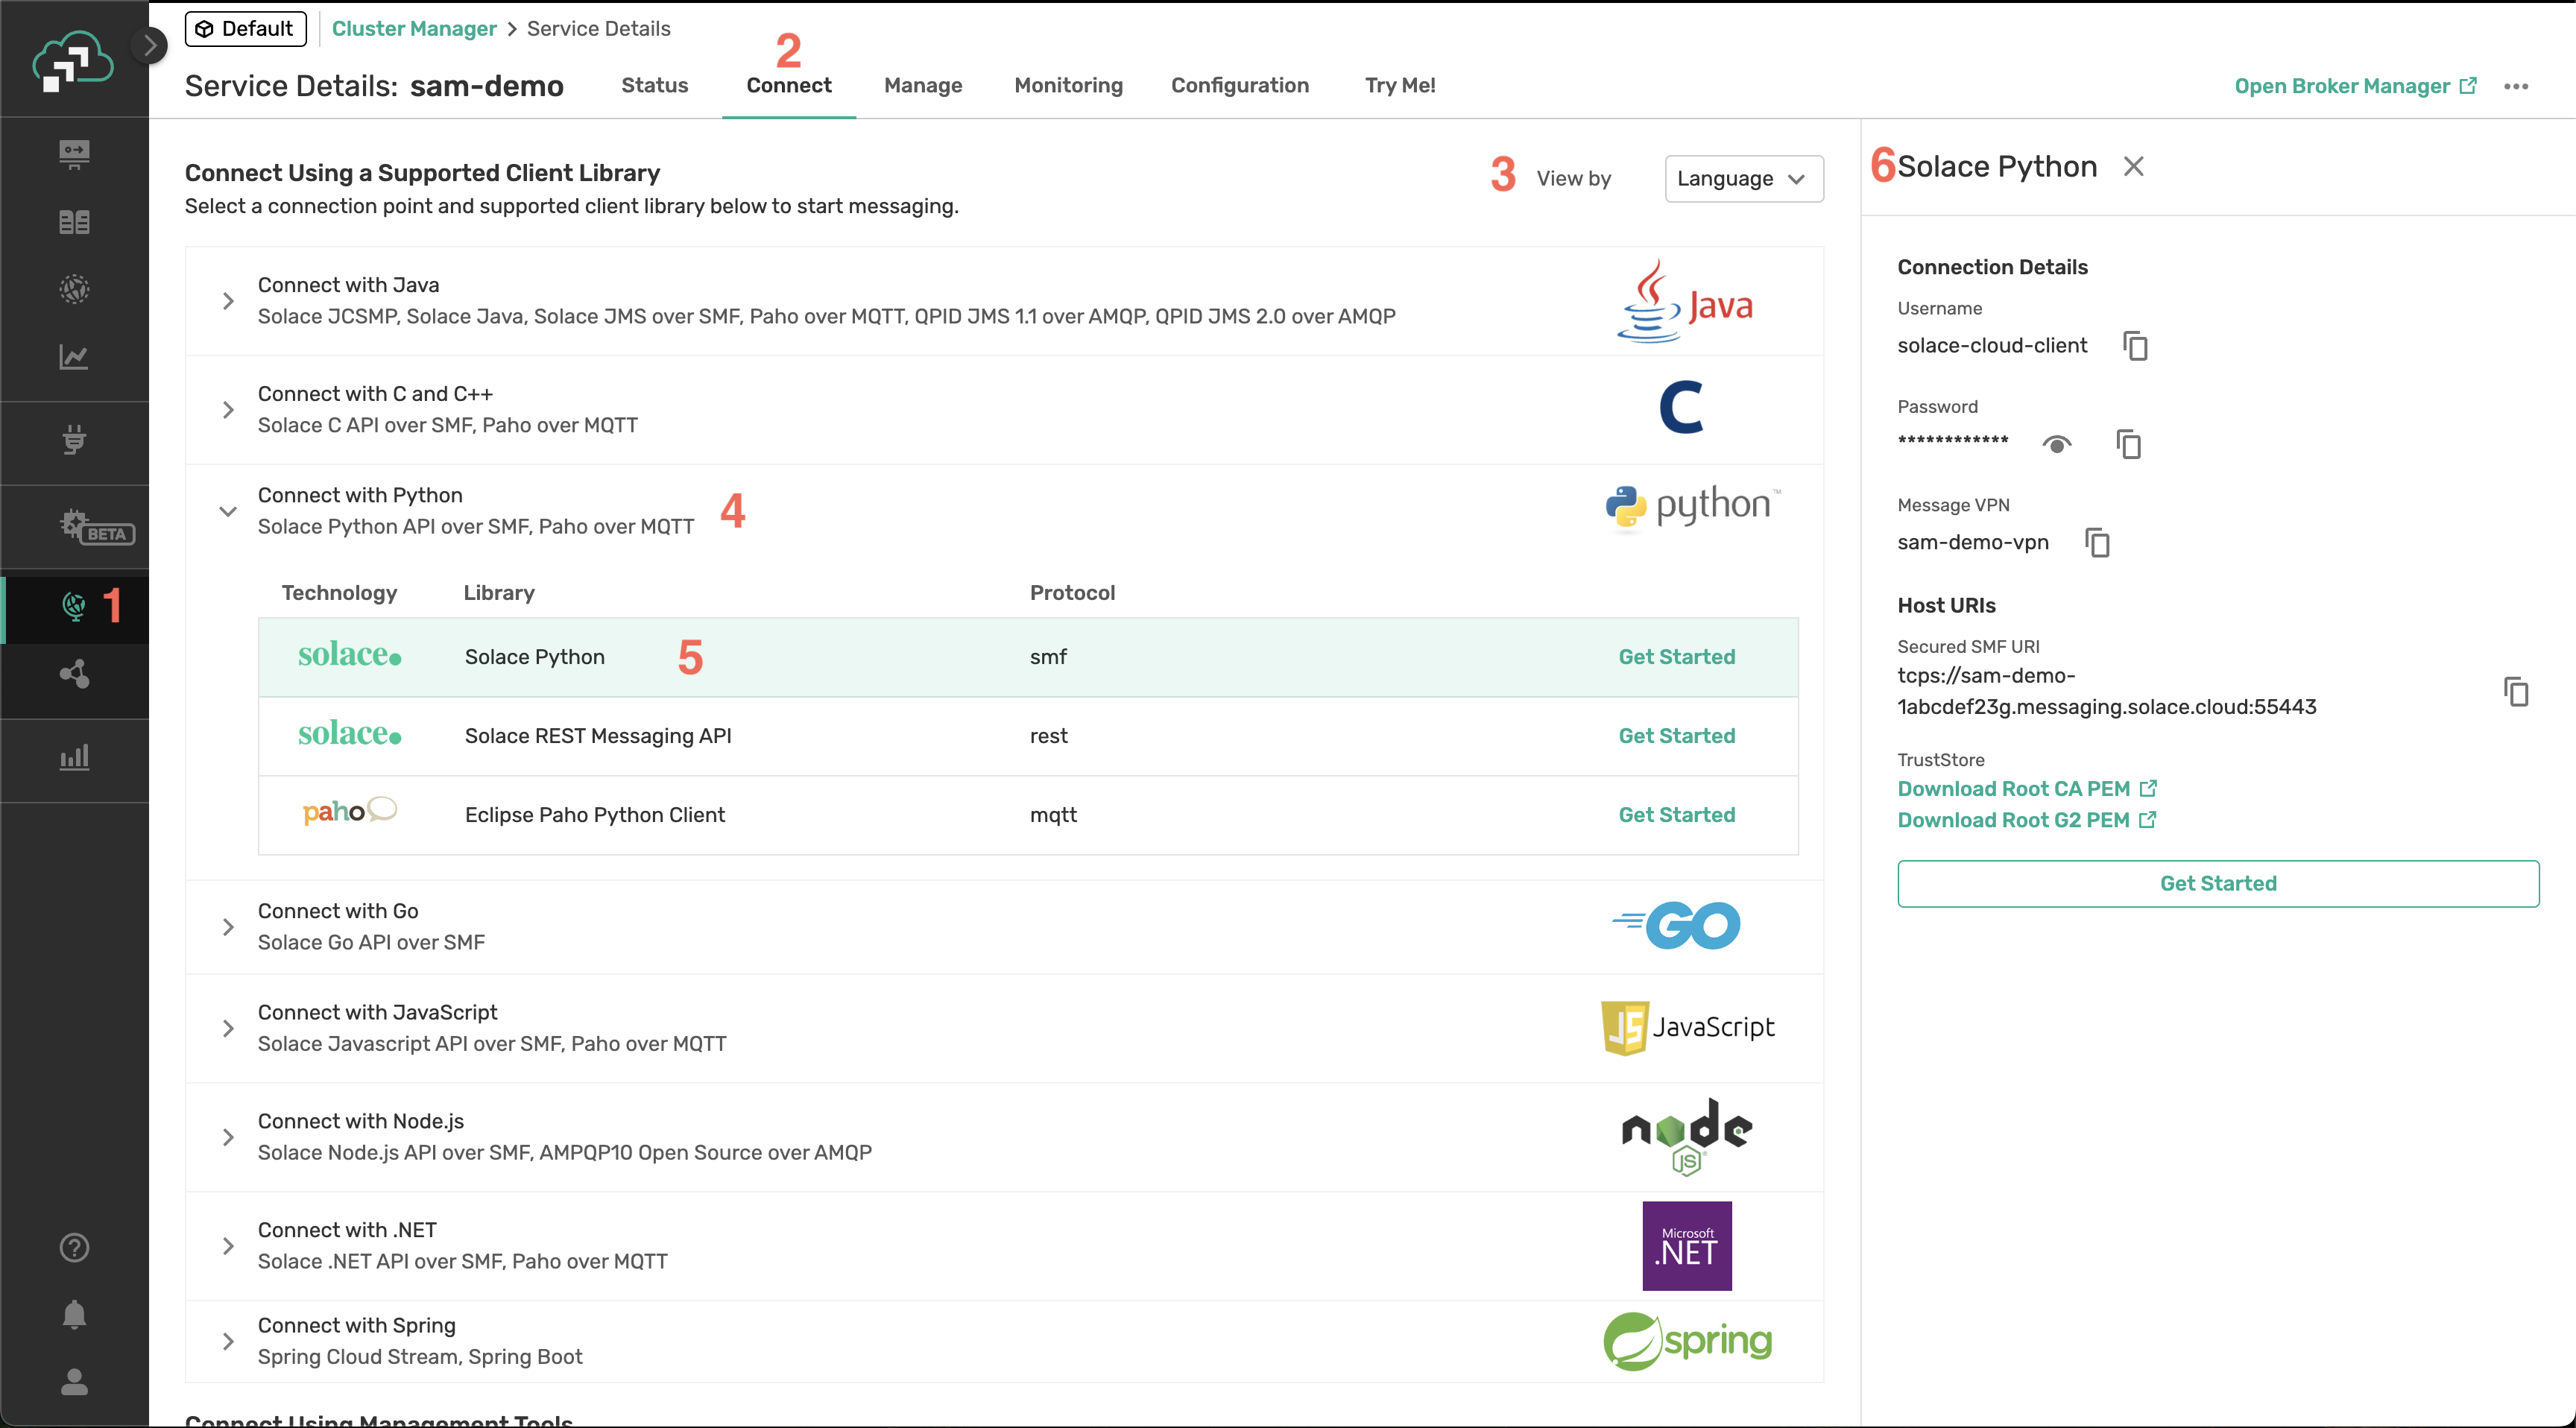
How to find your credentials
Go to Solace Cloud.
Cluster manager > Your Service > Connect
Switch dropdown to View by Language
Open the connect with Python dropdown
Click Solace Python with smf as the protocol.
Copy:
- Username for SOLACE_BROKER_USERNAME,
- Password for SOLACE_BROKER_PASSWORD,
- Message VPN for SOLACE_BROKER_VPN
- Secured SMF URI for SOLACE_BROKER_URL
Infrastructure Setup: S3 Buckets for OpenAPI Connector Specs
Some enterprise features require additional infrastructure setup. If you plan to use the OpenAPI Connector feature, you must configure a dedicated S3 bucket for OpenAPI specification files. This is separate from artifact storage and is required for agents to download OpenAPI specs at startup.
When is a connector specs bucket required?
- When using the OpenAPI Connector feature for REST API integrations
- When deploying via Kubernetes (Helm charts handle this automatically)
- When agents must access OpenAPI spec files at startup
Why a separate bucket?
- Public read access: Agents must download OpenAPI specs without authentication
- Security isolation: Keeps infrastructure files separate from user artifacts
- No secrets: Only API schemas, endpoints, and models are stored (never credentials)
Setup Instructions
-
Create the connector specs S3 bucket (public read, authenticated write):
aws s3 mb s3://my-connector-specs-bucket --region us-west-2 -
Apply a public read policy: Save as
connector-specs-policy.json:{
"Version": "2012-10-17",
"Statement": [{
"Sid": "PublicReadGetObject",
"Effect": "Allow",
"Principal": "*",
"Action": "s3:GetObject",
"Resource": "arn:aws:s3:::my-connector-specs-bucket/*"
}]
}Apply with:
aws s3api put-bucket-policy \
  --bucket my-connector-specs-bucket \
--policy file://connector-specs-policy.json -
IAM permissions for write access (for the SAM service):
- Grant
s3:PutObject,s3:DeleteObject,s3:ListBucketto the SAM platform's IAM user/role for this bucket.
- Grant
-
Kubernetes deployments: Use the
connectorSpecBucketNamevalue in your Helm chart. -
Standalone deployments: The platform manages the connector specs bucket; see your deployment guide.
Security Notes
- Never store API keys, passwords, or secrets in OpenAPI spec files
- Public read is safe for API schemas only
- Write access should be restricted to the platform
Accessing the Web UI
After starting the container in either development or production mode, you can access the Agent Mesh Enterprise web interface through your browser. The UI provides a graphical interface for managing agents, monitoring activity, and configuring your deployment.
Navigate to http://localhost:8001 in your web browser. The port number corresponds to the host port you specified in the -p 8001:8000 flag when running the container.
Troubleshooting and Debugging
If you encounter issues or need to investigate the behavior of your Agent Mesh Enterprise deployment, you can examine the log files generated by the container. These logs provide detailed information about system operations, errors, and debugging information.
To view logs, check the .log files in your container. For information about changing debug levels and advanced debugging techniques, see Diagnosing and Resolving Problems.