Installation
Step 1: Prepare the Enterprise Image
All the docker commands can also be ran using any docker compatbile tool like podman
Download the latest enterprise docker image tarball from the Solace Product Portal.
Load the image using Docker with the following command.
docker load -i solace-agent-mesh-enterprise-<tag>.tar.gz
Ensure you replace <tag> with the appropriate version.
Step 2: Get Image name
Once loaded, run the following command to verify your installation.
docker images
Example output:
REPOSITORY                                                                 TAG                IMAGE ID      CREATED      SIZE
868978040651.dkr.ecr.us-east-1.amazonaws.com/solace-agent-mesh-enterprise  1.0.37-c8890c7f31  2589d25d0917  9 days ago   5.25 GB
Take note of the name and tag of the image.
In this case our image name would be:
868978040651.dkr.ecr.us-east-1.amazonaws.com/solace-agent-mesh-enterprise:1.0.37-c8890c7f31
Note the hashes at the beginning and end (868978040651 and c8890c7f31, respectively) could be different for each version.
Step 3: Running Solace Agent Mesh Enterprise
Here are two examples of Docker run commands for both a development use case as well as a production use case:
You may need to include --platform linux/amd64 depending on the host machine you’re using.
Development Use Case
docker run -itd -p 8001:8000 \
  -e LLM_SERVICE_API_KEY="<YOUR_LLM_TOKEN>" \
  -e LLM_SERVICE_ENDPOINT="<YOUR_LLM_SERVICE_ENDPOINT>" \
  -e LLM_SERVICE_PLANNING_MODEL_NAME="<YOUR_MODEL_NAME>" \
  -e LLM_SERVICE_GENERAL_MODEL_NAME="<YOUR_MODEL_NAME>" \
  -e NAMESPACE="<YOUR_NAMESPACE>" \
  -e SOLACE_DEV_MODE="true" \
  --name sam-ent-dev \
  solace-agent-mesh-enterprise:<tag>
Example
docker run -itd -p 8001:8000 \
  -e LLM_SERVICE_API_KEY="<YOUR_LLM_TOKEN>" \
  -e LLM_SERVICE_ENDPOINT="https://lite-llm.mymaas.net/" \
  -e LLM_SERVICE_PLANNING_MODEL_NAME="openai/vertex-claude-4-sonnet" \
  -e LLM_SERVICE_GENERAL_MODEL_NAME="openai/vertex-claude-4-sonnet" \
  -e NAMESPACE="sam-dev" \
  -e SOLACE_DEV_MODE="true" \
  --name sam-ent-dev \
  868978040651.dkr.ecr.us-east-1.amazonaws.com/solace-agent-mesh-enterprise:1.0.37-c8890c7f31
Production Use Case
docker run -itd -p 8001:8000 \
  -e LLM_SERVICE_API_KEY="<YOUR_LLM_TOKEN>" \
  -e LLM_SERVICE_ENDPOINT="<YOUR_LLM_SERVICE_ENDPOINT>" \
  -e LLM_SERVICE_PLANNING_MODEL_NAME="<YOUR_MODEL_NAME>" \
  -e LLM_SERVICE_GENERAL_MODEL_NAME="<YOUR_MODEL_NAME>" \
  -e NAMESPACE="<YOUR_NAMESPACE>" \
  -e SOLACE_DEV_MODE="false" \
  -e SOLACE_BROKER_URL="<YOUR_BROKER_URL>" \
  -e SOLACE_BROKER_VPN="<YOUR_BROKER_VPN>" \
  -e SOLACE_BROKER_USERNAME="<YOUR_BROKER_USERNAME>" \
  -e SOLACE_BROKER_PASSWORD="<YOUR_BROKER_PASSWORD>" \
  --name sam-ent-prod \
  solace-agent-mesh-enterprise:<tag>
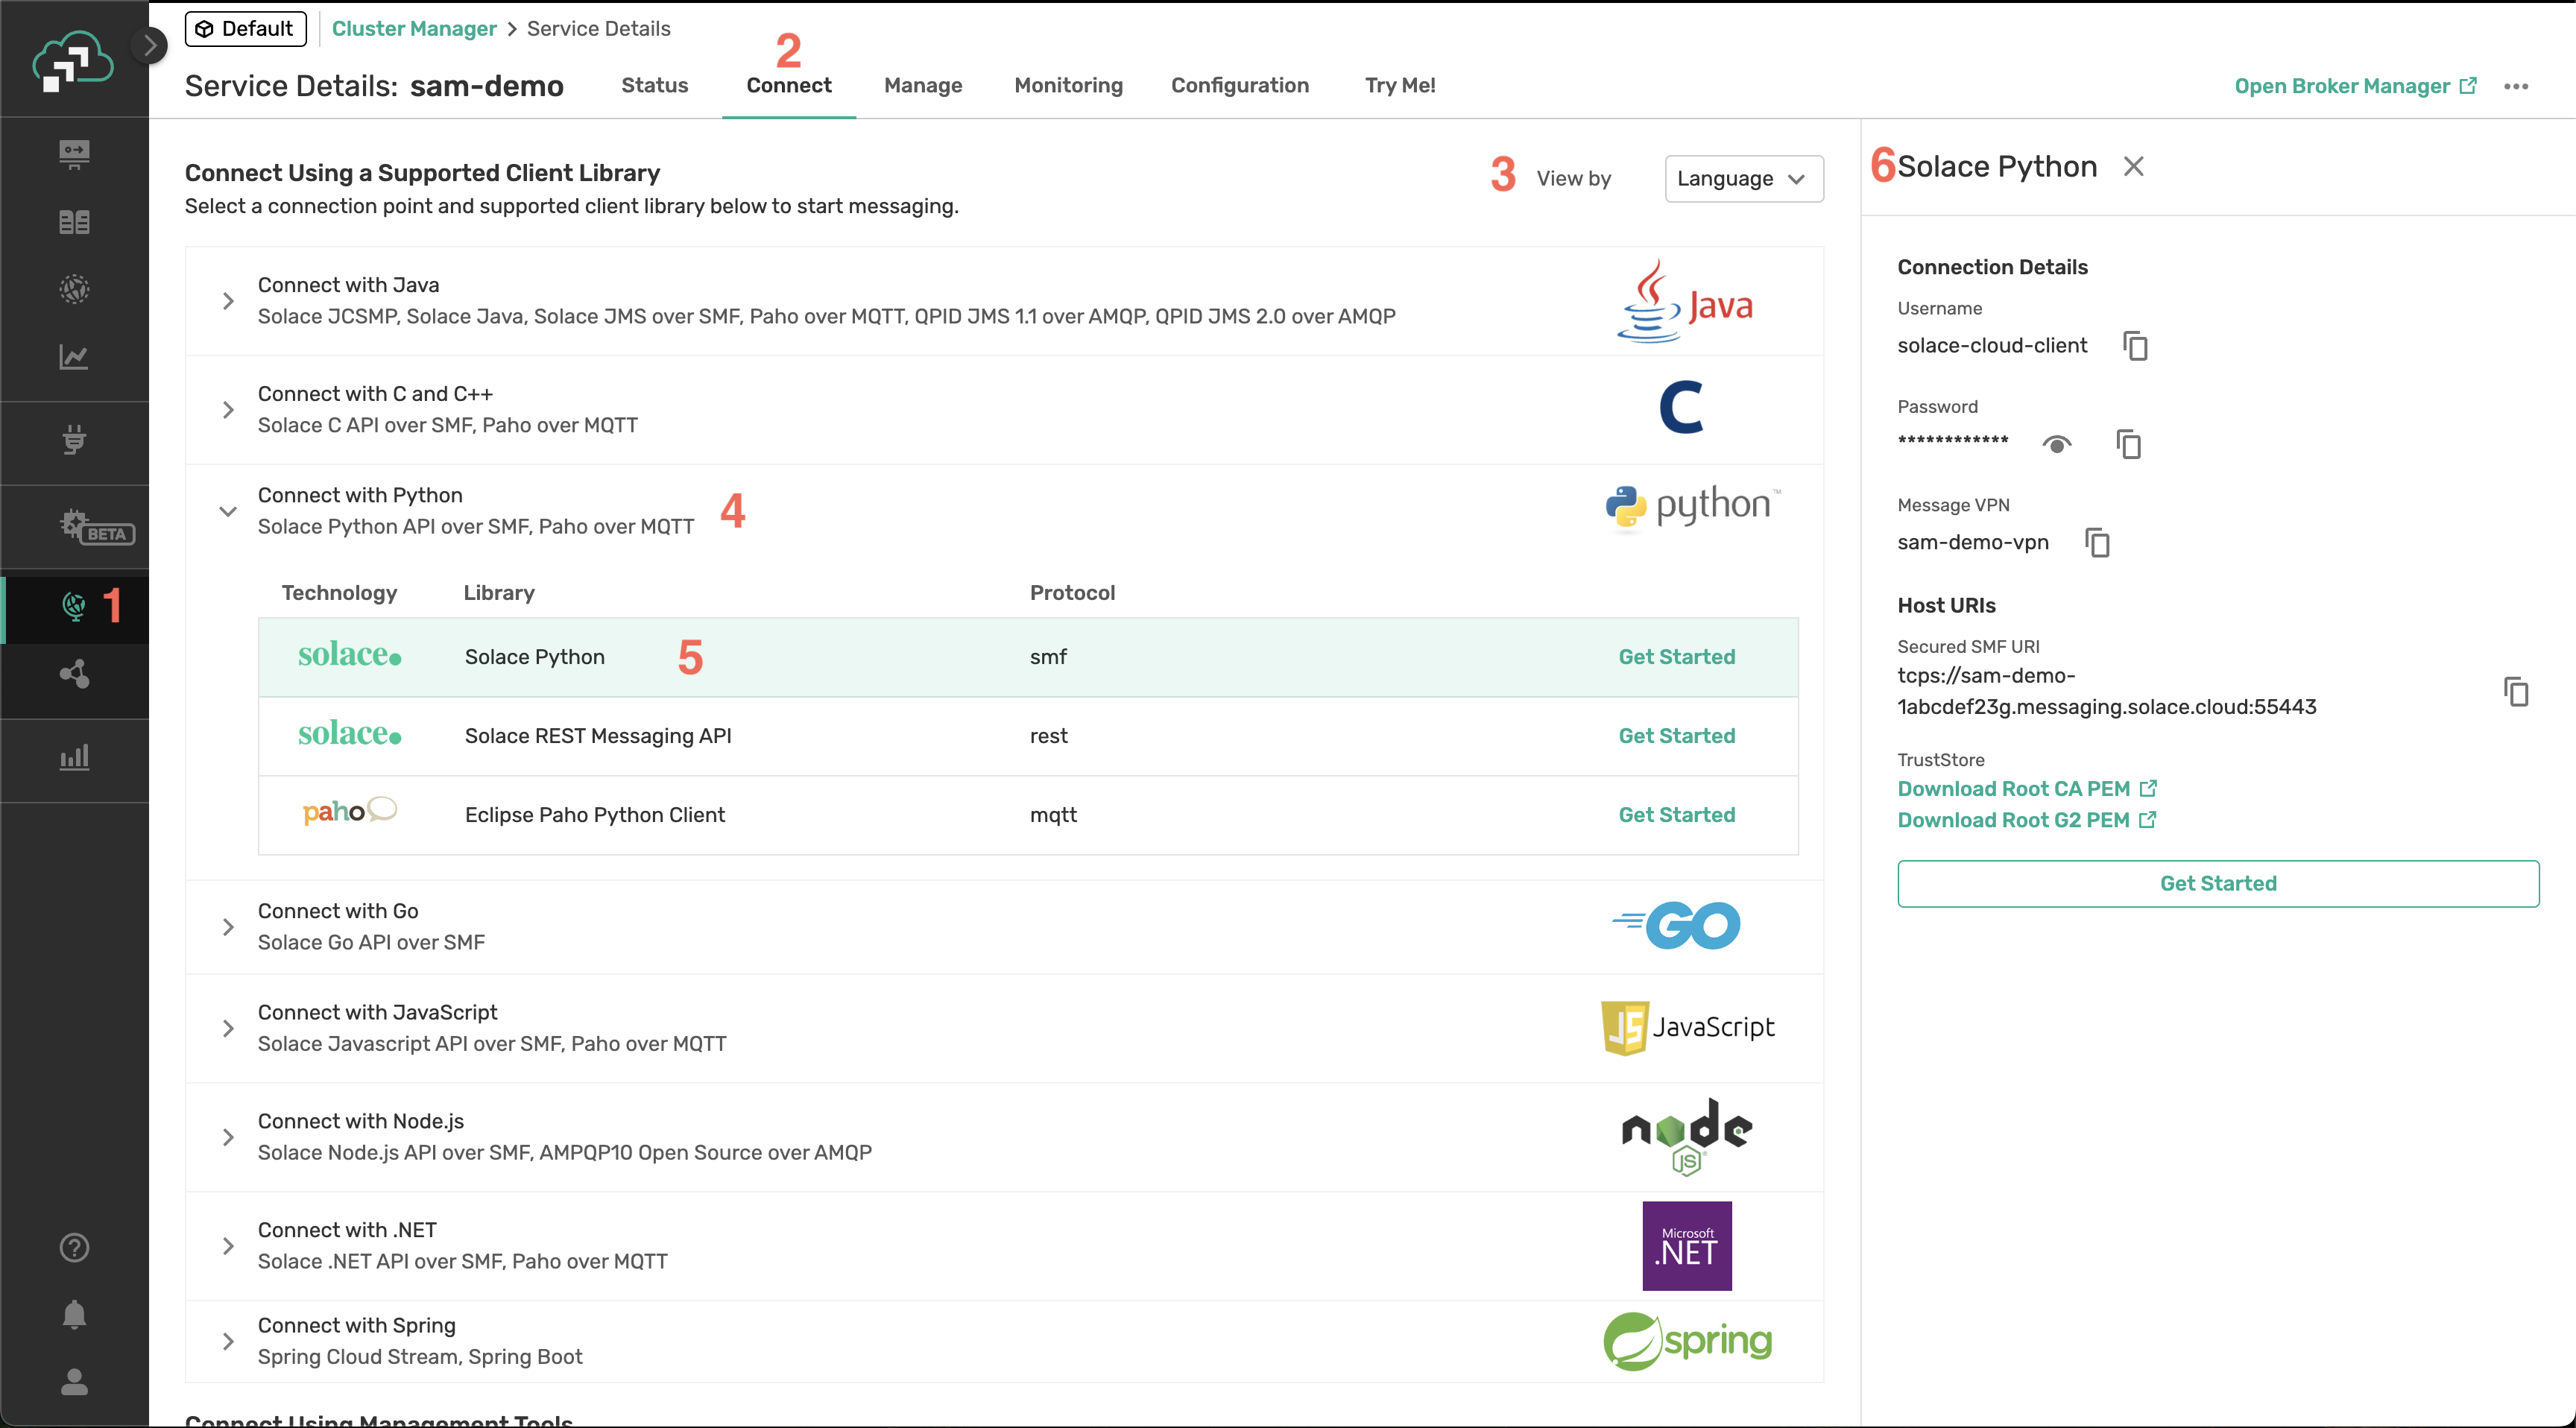
How to find your credentials
Go to Solace Cloud.
Cluster manager > Your Service > Connect
Switch dropdown to View by Language
Open the connect with Python dropdown
Click Solace Python with smf as the protocol.
Copy:
- Username for SOLACE_BROKER_USERNAME,
- Password for SOLACE_BROKER_PASSWORD,
- Message VPN for SOLACE_BROKER_VPN
- Secured SMF URI for SOLACE_BROKER_URL
You can then access Solace Agent Mesh Enterprise UI through http://localhost:8001
If you want to see logs for debugging, check .log files. If you want to change debug levels, see more here